Lets3dPrint
1.7 What's new in this edition

1.7: it fits the first time

We read what makers ask about on the Bambu Lab and Prusa forums. The most common question is not a missing modelling tool. It is why the lid is too tight, the insert will not go in, or the magnet falls out. Lets3dPrint 1.7 answers it: one fit for every hole, thread and joint, tuned to your own printer. And when the part is too big, it splits it into pieces that fit the bed, with pins, magnets and labels.

Free and Pro stay as they are: the new modelling tools are free; export and Print Check, with its fix buttons, are Pro. One option is in the App Store version only and is marked so. The two ways to get it

Fit

One fit list for everything that goes together

Every maker's blog has its own clearance table, and half the mistakes come from mixing up "per side" with "on the diameter". In 1.7 you pick how the parts should go together. The tool adds the right gap, always shown as the gap on each side.

Hole · Thread · Joint Split · Twist lock · Split to Bed · free

Pick the fit, not a number

Choose a fit next to the diameter and the panel shows the size it will be drilled at. Threads, puzzle joints and twist locks take the same list.

FitA sideFor
Exact0Comes out at the size typed
Press0.10 mmPins and magnets that stay put
Tight0.15 mmGoes in with a push and holds
Slide0.20 mmSliding lids, axles that turn
Loose0.30 mmDrops in with a little play
Print-in-place0.40 mmHinges printed together
Slide · 0.20 mm a side the gap on each side, never on the diameter
1245 3 first one the peg slides into 0.30 mm there → your printer needs +0.10
Fit panel · free

Tuned to your printer from one test print

Holes from one printer come out a few tenths smaller than from another. Print the Fit test from the library and try the pegs. Tell the app which hole the peg first slides into, and every fit in the project moves by that much.

  1. Library → Fit test, print it
  2. Fit panel: "hole 3 slides"
  3. Every hole, thread and joint follows
Nut M3hex 5.8 Insert M3Ø 4 · 6.7 deep Magnet 6 × 26.2 × 2.1
Fastener · free

Holes sized for the hardware

Pick what goes in the hole and its size; the app knows the numbers. Heat-set inserts get the makers' hole and a millimetre extra depth. Nut traps get a hex pocket with a bridge layer when they face the bed. Magnets get the pocket that holds them.

  • Screw through, socket head, self-tapping, heat-set insert, captive nut, magnet
  • Change a number and it becomes your own size

Too big for the bed

Split it into pieces that fit, in one click

Big parts used to be cut in the slicer, and its dowels never fit their holes. In 1.7 a body that does not fit your printer says so and offers Split to Bed: a grid of cuts sized to the bed, connectors on every cut face with your fit, and a label on every piece.

Split to Bed · free

Pins, magnets and labels, with your fit

The grid uses the bed less 5 mm on each side and as few pieces as fit, or the number you type per axis. Every cut face gets two or more connectors, about one per 40 mm, and a spot that would break out is left out.

  • Pins for 1.75 mm filament or 3 to 6 mm dowels, or pockets for the magnets from the Fastener list
  • A1, A2… sunk 0.6 mm into a cut face, clear of the connectors; the bodies take the same names
  • Pins and magnets on a plain plane split too, where a twist lock would not fit
  1. The red outline says the part is too big; click Split to Bed
  2. Pick pins or magnets, check the pieces drawn apart
  3. OK: one body per piece, ready to export
the bed A1 A2 pins Ø 1.75 · Loose fit two pieces that each fit

Prints that come off right

Fixes, not only warnings

Print Check shows what will not print and, in 1.7, offers the fix as a button next to each warning. The tools that do the fixing are there to use on any part, Pro or not.

round: droops chamfer: prints clean
Fillet · Print Check

Round edges on the bed become chamfersPro

A fillet where the part sits on the bed curls up from flat and droops. The Fillet tool says how far it leans and offers a chamfer instead, free. Print Check lists every such fillet with a Make Chamfer button.

+1.5 mm the faces around follow
Offset Face · free

Push and pull any face

Click faces, drag the arrow or type: a wall gets thicker, a hole narrower, a downloaded bracket longer. It works on imported STL files too, and Print Check's Thicken button uses it to make a thin wall two lines wide.

weakest across the layers
Layers view · free

See which way the layers run

Turn on Layers and the print layers are drawn on the model: every layer up close, every fifth or tenth further away. A part is about half as strong across its layers as along them, so you see where to turn it.

bridge 60 mm longest your printer bridges: 10 mm orange in Print Check, with Show
Print Check

Bridges and steps too shallow to showPro

A flat underside above the bed wider than your printer bridges (10 mm to start; set yours in the panel) is listed and drawn on the model. So is relief whose walls are lower than one layer: it would print as nothing.

Make Teardrop 0.3 → 0.8 mm Widen
Print Check

Make Teardrop and WidenPro

A round hole on its side (Ø 5 mm or more) gets a Make Teardrop button: one click, one undo step. A gap between two faces that would fuse gets Widen, which pushes the faces apart with Offset Face and shows the result before OK. Thin walls get Thicken, fillets on the bed Make Chamfer.

Thread library

Five standards, and the parts that use them

Metric was there from the start. 1.7 adds the inch, pipe, bottle and jar threads makers meet at home, each with the size that fits your rod or hole picked for you.

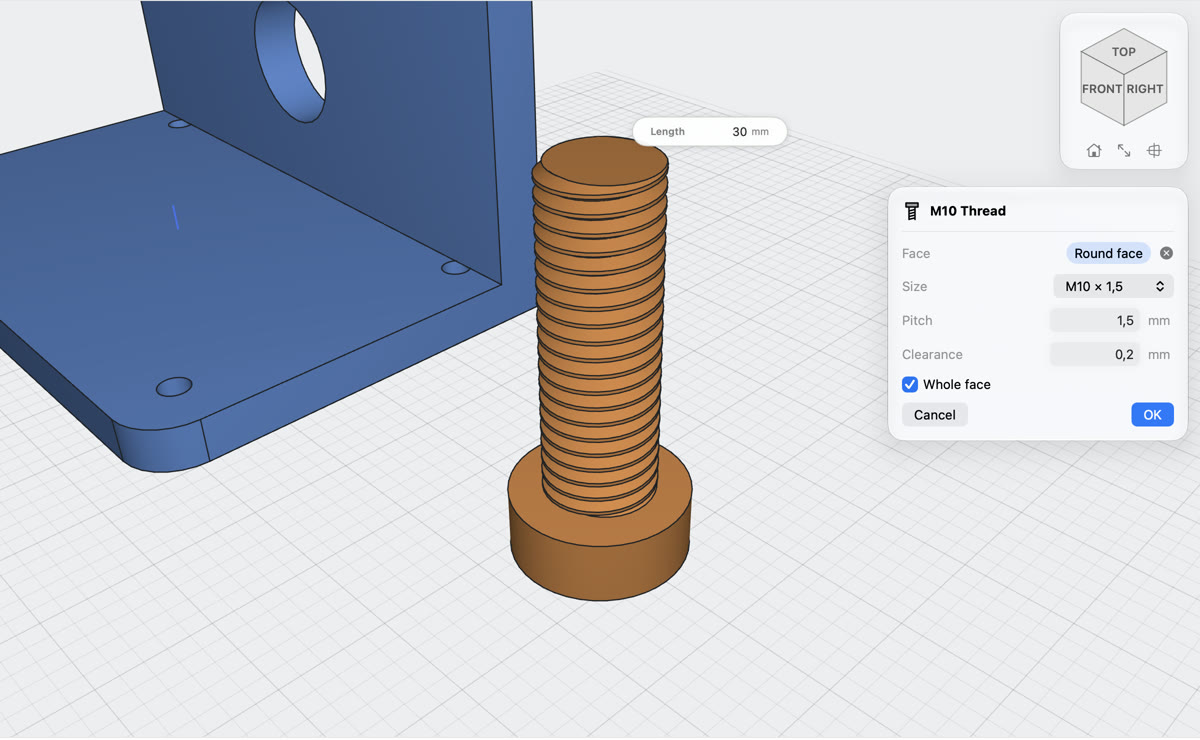
A bolt and a nut with their threads, the Thread dialog beside them
Thread · free

Metric, UNC/UNF, pipe G, bottle, jar

Pick the standard in the Thread tool and the fitting size follows: UNC and UNF from #4 to 1/2", pipe G1/8 to G1 with the 55° form, the PCO-1881 thread of a soda bottle, and the mason-jar threads 70-450 and 86-450 with their trapezoid groove. Files from before 1.7 open as metric, as they were.

  • Outside on rods and inside in holes, with a fit from the list or your own clearance
  • In the script: unc "1/4-20", pipe "G1/2", bottle, jar 70
bottle cap jar lid 123 fit test three new library parts
Parts library · free

Caps, lids and a thread fit test

A soda-bottle cap that is closed, has a hole, or ends in a hose barb. A mason-jar lid for regular and wide mouths, plain, with a straw hole or for sprouting. And a thread fit test: one bolt and numbered nuts at rising clearance, so you learn which fit your printer gives a thread.

Photo Outline

Lay it on paper, photograph it, cut its pocket

Tools on a sheet of A4 or Letter, one photo, and the outlines land in a sketch at their real size. From there, Make Bin cuts a pocket for each one in a Gridfinity-compatible bin.

photo on A4 sketch, in mm
Photo Outline · free

From a photo to a sketch at real size

The sheet is found in the photo and straightened, the objects traced against the paper's grey, specks dropped, the lines smoothed into one closed spline each and grown by the Slide fit. The dialog shows the photo with the sheet it found; paper size, sensitivity, smoothing, grow and smallest object are yours to set. The result is one sketch step.

  • All on your Mac; the photo is not kept in the project
  • Generate → Photo Outline, or ⌘K "photo"
42 mm units · a pocket per outline · finger notch
Make Bin · free

A Gridfinity bin with a pocket per tool

From the outline sketch, Make Bin builds a Gridfinity-compatible bin in 42 mm units, one pocket per outline and a finger notch to lift each tool out, as a library-style part with values and a preview. If the bin is bigger than your bed it says so, and Split to Bed takes it from there.

Gear System

Type the ratios. Get the gearbox.

Generate → Gears. Say how many gear planes you have, where the input turns and which way, and what each output should do: ×2, 1/4, 3:1, the same way or the opposite, anywhere or at a point you name. The app lays out the train, the plate and the pins, and plays it.

Generate → Gears · free

The smallest train that does it

The solver looks for the fewest gears, then the smallest. A ratio too steep for one pair becomes a compound gear climbing to the next layer; an idler fixes the direction or reaches an axle you fixed; several outputs share stages where they can. A ratio that cannot be done in the layers you allowed is refused with the reason, never quietly done with more.

  • Spur gears, one input, a tree of outputs; ratios as exact fractions, up to six layers
  • One body per shaft (gears fused with a hub; round, D or hex bore) and a plate with pins or holes, named and coloured
  • Drag a gear round its driver, type its teeth, add or remove idlers, Recreate; Play, pause and scrub the animation
  • Pins 15 mm with a Loose fit plus your printer's offset, after the first real print bound on thinner ones
  • In the script: gears "Gearbox" layers 2 input teeth 20 output 1/4 opposite output 3 same
input 1/4 · opposite ×1 · same (idler)
4 × 1/2
Gear System

Outputs around the inputApp Store only

Type a count and one ratio instead of a list of outputs: that many output gears sit in a ring round the input, evenly spaced, all at the same ratio. For a spinner, a planetary-looking display or four axles from one motor. This option is in the App Store version of 1.7; the direct download has the Gear System without it.

layer 2 plate with pins, 15 mm
Gear System

Printable from the start

Gears on one shaft are fused with a hub, the layers are 0.6 mm apart, and the plate's margin leaves room round every hub. Press Play and the whole train turns on screen at the right speeds; the model itself is not moved, so OK gives you the bodies as laid out. Stand it on a face of another body and the plate joins it.

Labels and colour

Two colours without a colour change

Flush multi-colour text usually means making a second body by hand and cutting the first with it. In 1.7 it is one choice in Emboss.

flush with the top body: filament 1 · letters: filament 2
Emboss · Inlay · free to model

Inlays for your AMS or MMU

Pick Inlay in Emboss: the letters are sunk in and filled with their own body, flush with the face. Every body gets a filament slot, and the exported 3MFPro carries it in the settings Bambu Studio, OrcaSlicer and PrusaSlicer read for each part.

0.4 mm: blobs ≥ 2 × nozzle
Emboss · free

Text checked against your nozzle

Emboss warns when a letter's stroke is narrower than two nozzle lines, or the text is too shallow to show: under 0.3 mm raised or 0.5 mm sunk. You find out before the print, not after.

Parts library

Six new parts, nineteen in all

The generators makers use most on the model sites, as parts you can still change. Every part now shows a picture of itself, and a part you inserted can be reopened with its values.

Snap-fit enclosure

A case and a lid that clicks on, with as many screw posts as your board needs (a grid of up to 4 × 4), pilot holes for self-tapping screws and vent slots.

Hinged box

Box and lid printed flat side by side, joined by a print-in-place hinge. The number of knuckles and the clearance are yours to set.

Hose adapter

Two hose ends of different sizes, barbed or plain, with a cone between that is never steeper than 45°.

Soda-bottle cap

The PCO-1881 thread of every soda bottle, as a closed cap, a cap with a hole, or a hose-barb adapter.

Mason-jar lid

Regular or wide mouth (70-450 and 86-450): plain, with a straw hole, or a sprouting lid.

Thread fit test

A bolt and numbered nuts at rising clearance: print them, find the nut that turns, and you know your printer's thread fit.

The parts library, every part shown as a picture of itself
Parts library · free

Every part shows itself

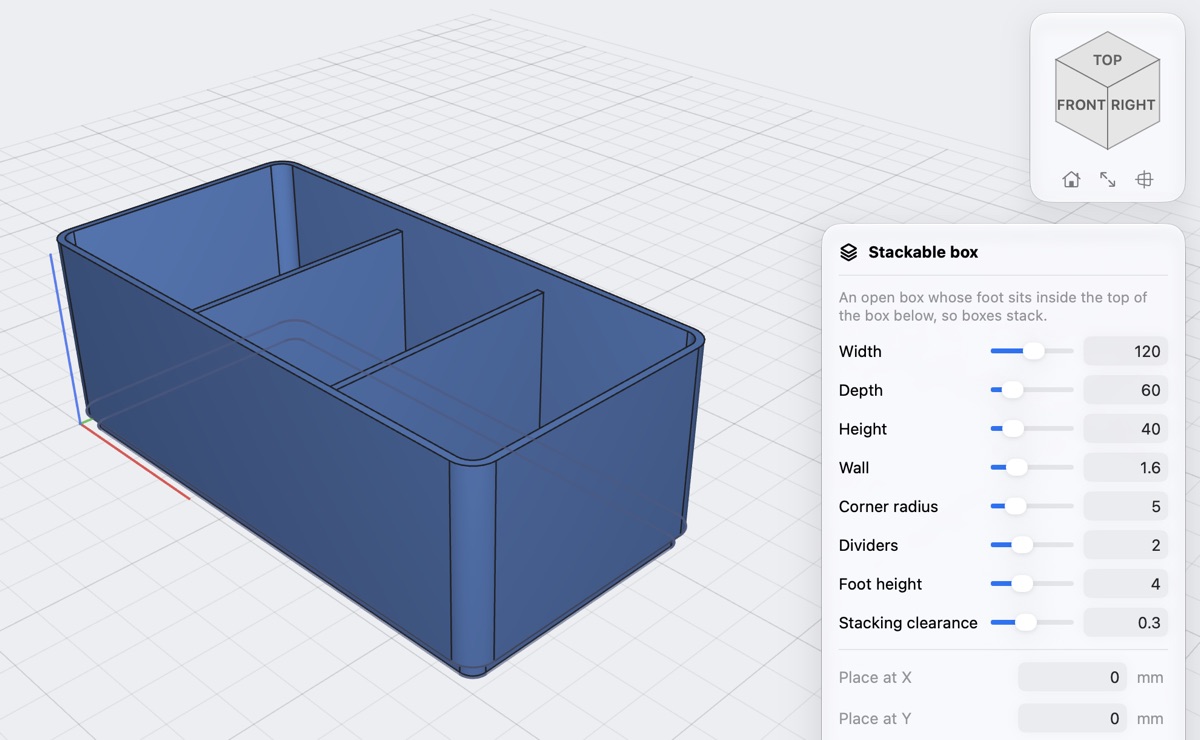
Each part, and each of your own in My Parts, is drawn from its script in the background and shown in the library in the same look as the viewport. The picture follows the part when its script changes.

Stackable box 8 steps Width 60 Dividers 2 OK the later steps keep building
Edit Library Part · free

Reopen a part you inserted

An inserted part remembers which part it was and its values. Edit Library Part, in the inspector, the timeline, the body menu or ⌘K, opens the dialog again with the sliders where you left them. OK is one undo step, and the steps keep their place, so a fillet or a label you added afterwards still builds. The app warns if you changed its steps by hand.

1.8 · Coming next

Planned for 1.8

What is on the list for the next App Store update. Planned, not promised: the order follows what you ask for, and anything not ready moves to the release after.

Planned

Stretch, STL holes, colour by height, pegboard, more threads

Stretch: pick a plane through a part and a distance; everything on one side moves and the holes keep their size. Downloaded STL holes: click a hole in an imported STL and type the size or pick a fastener. Colour by height: a filament change at a height, written into the 3MF. Pegboard and openGrid parts in the library. Tr (trapezoidal) and bayonet threads. Updates come through the App Store at no cost; the direct download stays at 1.7.

StretchSTL holesColour by heightPegboard · openGridTr · bayonet

Something missing? Ask for it →

Get 1.7 today

Free on the Mac App Store, with Pro inside when it is time to print, or as a direct download of the Free plan. Model as much as you like for free.

Download free

macOS 26 or later · Apple silicon · Direct download (.dmg)